Simple Mask That Faded My Acne Scars in 2 Weeks
You can fade your acne scars in just two weeks using a simple DIY mask with natural ingredients. Combine honey, aloe vera, and a splash of lemon juice to create a healing blend. Apply it to your cleansed face, focusing on the scarred areas, and let it sit for 15-20 minutes. Use this mask two to three times a week for the best results. Interested in learning more about the ingredients and techniques? There’s plenty more to discover!
Key Takeaways
- A simple DIY mask using honey, aloe vera, and vitamin C can effectively fade acne scars in just two weeks.
- Exfoliating agents like yogurt or oatmeal remove dead skin cells, promoting a fresher skin layer and aiding scar reduction.
- Apply the mask two to three times a week for optimal results and consistent skin regeneration.
- Follow up with a gentle moisturizer to lock in hydration and maintain skin health post-mask.
- Gradual improvements are expected; patience and a consistent skincare routine are essential for effective scar fading.
Understanding Acne Scars
Acne scars can be a frustrating reminder of past breakouts. Understanding the nature of these scars is essential to effectively managing them. They form when the skin undergoes inflammation during acne, leading to changes in the skin’s texture and pigmentation.
Some scars may appear as deep pits, while others may be raised or discolored. To tackle these stubborn marks, you need a reliable acne scar remedy tailored to your skin type. This remedy should focus on promoting skin regeneration and reducing inflammation. Additionally, incorporating natural remedies such as effective home treatments can further aid in diminishing the appearance of scars.
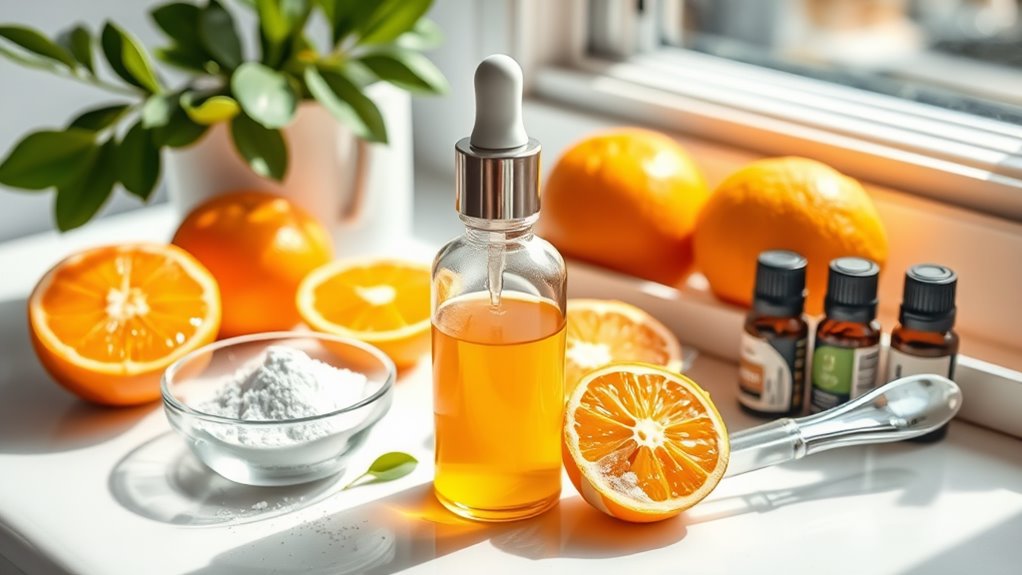
Key Ingredients for the Mask
When creating a DIY mask for acne scars, selecting the right ingredients is essential for achieving the best results. You’ll want to incorporate ingredients known for their healing and brightening properties.
Look for honey, which has natural antibacterial qualities and promotes healing. Aloe vera is another powerhouse; it soothes inflammation and hydrates the skin.
Vitamin C-rich ingredients, like lemon juice or orange zest, help brighten dark spots and encourage collagen production. Exfoliating agents, such as yogurt or oatmeal, can gently slough off dead skin cells, revealing a fresher layer underneath.
Finally, consider adding a few drops of tea tree oil for its potent anti-inflammatory benefits. Together, these ingredients form a potent blend to reduce the appearance of scars effectively. Additionally, using natural remedies can enhance the efficacy of your homemade treatments.
DIY Face Mask Recipe
Now that you know the key ingredients for your DIY mask, let’s get into the actual recipe. You’ll learn how to effectively apply it and how often to use it for the best results. Incorporating proven ingredients in your mask can significantly enhance its effectiveness in fading acne scars.
Key Ingredients Explained
Creating an effective DIY mask for acne scars hinges on selecting the right ingredients that target skin healing and rejuvenation.
Start with honey, a natural humectant that hydrates and promotes healing due to its antimicrobial properties. Next, incorporate aloe vera, which soothes inflammation and accelerates skin repair.
You’ll also want to add lemon juice; its vitamin C content brightens dark spots and helps exfoliate dead skin cells. Finally, consider using yogurt, rich in lactic acid, to gently exfoliate and improve skin texture.
Each of these ingredients works synergistically to fade scars, soothe irritation, and enhance your skin’s overall appearance. Mastering this blend will empower you to achieve radiant skin while naturally addressing those stubborn marks.
Application Techniques
To effectively apply your DIY mask for acne scars, start by cleansing your face thoroughly to remove dirt and oil. This guarantees your skin can absorb the mask’s potent ingredients.
Next, pat your skin dry with a clean towel, then use clean fingers or a brush to evenly distribute the mask across your face, focusing on scarred areas. Apply a thin, even layer—too thick can hinder absorption.
Allow the mask to sit for 15-20 minutes so your skin can fully benefit from the nutrients. While it’s on, relax and avoid touching your face to prevent irritation.
Finally, rinse off with lukewarm water, gently pat your skin dry, and follow with your favorite moisturizer to lock in hydration.
Frequency of Use
After applying your DIY mask, it’s important to contemplate how often you should use it for the best results. Aim to use the mask two to three times a week.
This frequency allows your skin to benefit from the active ingredients without overwhelming it. If you notice any irritation or sensitivity, scale back to once a week until your skin adjusts.
Consistency is key, so stick to your schedule for at least two weeks to see noticeable improvements in your acne scars.
Remember, everyone’s skin is unique, so listen to your body. Adjust the frequency based on how your skin responds, ensuring you maintain a balance between effective treatment and gentle care.
Your patience will pay off.
Step-by-Step Application Guide
Now that you’ve got your DIY face mask ready, it’s time to get into the application process.
First, gather all your ingredients to guarantee you have everything you need at hand.
Then, I’ll share some tips on how to apply the mask effectively and how often you should use it for the best results. Additionally, using ingredients like lemon and potato can enhance the mask’s effectiveness due to their skin-brightening properties.
Gather Your Ingredients
Gathering your ingredients is an essential first step in creating an effective DIY mask for acne scars. You’ll want to guarantee you have the right components that deliver potent results. Here’s a neat table to help you identify what you need:
| Ingredient | Purpose | Quantity |
|---|---|---|
| Honey | Moisturizes and heals | 2 tablespoons |
| Lemon Juice | Brightens and exfoliates | 1 tablespoon |
| Yogurt | Soothes and nourishes | 3 tablespoons |
| Turmeric | Reduces inflammation | 1 teaspoon |
Once you’ve gathered these ingredients, you’re on your way to mastering a mask that could transform your skin. Prepare to plunge into the next steps with confidence!
Application Technique Tips
To achieve the best results from your DIY mask for acne scars, follow these simple application techniques.
First, cleanse your face thoroughly to remove any impurities. Pat your skin dry with a clean towel.
Next, apply a generous layer of the mask using your fingertips or a brush, focusing on the areas with scars. Avoid the delicate eye area.
Once applied, gently massage the mask into your skin for a couple of minutes to enhance absorption.
Allow the mask to sit for the recommended time—typically 10 to 20 minutes—before rinsing it off with lukewarm water.
Finish by patting your face dry again and follow up with a soothing moisturizer to lock in hydration and promote healing.
Recommended Frequency Schedule
After mastering the application technique, it’s important to establish a recommended frequency schedule for using your DIY mask.
Start by applying the mask twice a week. This frequency allows your skin to benefit from the active ingredients without overwhelming it. Make sure to observe how your skin reacts; if it feels irritated, reduce applications to once a week.
As your skin adjusts and improves, you can gradually increase to three times a week, but listen to your skin—it’s your best guide.
Consistency is key, but don’t rush the process. Stick to this routine for at least two weeks, then reassess.
With patience and dedication, you’ll see significant fading of those acne scars.
Frequency of Use
Regularly using a DIY mask for acne scars can greatly enhance your skin’s appearance over time. Aim to apply the mask two to three times a week for ideal results. This frequency allows your skin to absorb the beneficial ingredients without overwhelming it. Always listen to your skin’s response; if irritation occurs, reduce usage. Consistency is key—don’t skip sessions if you want to see significant changes. Make sure you follow up with a gentle moisturizer to keep your skin hydrated and balanced. Additionally, consider incorporating an overnight spot treatment with natural remedies to target specific blemishes. With patience and discipline, you’ll notice a gradual fading of those pesky scars. Stick to this routine, and you’ll be on your way to mastering your skincare game and achieving that clearer, more even complexion you desire.
Before and After Expectations
When you start using a DIY mask for acne scars, it’s important to have realistic expectations for your skin’s transformation. You mightn’t see dramatic results overnight, and that’s perfectly normal.
Typically, noticeable improvements can take a couple of weeks, so patience is key. Expect your scars to gradually fade rather than disappear completely. Consistency in your application will play an essential role in your results, so stick to your routine.
After two weeks, you should notice a smoother texture and a reduction in discoloration. Remember, everyone’s skin responds differently, so give your skin the time it needs to heal.
Celebrate small victories along the way; they’ll motivate you to stay committed to your skincare journey.
Scientific Explanation of Ingredients
Understanding the scientific properties of the ingredients in your DIY mask can make a significant difference in how effectively they combat acne scars.
For instance, ingredients like honey possess natural humectant properties, attracting moisture to your skin and promoting healing. Vitamin C, found in citrus fruits, is a powerful antioxidant that brightens your skin and stimulates collagen production, aiding in cellular turnover.
Additionally, aloe vera contains compounds that reduce inflammation and redness, helping to soothe irritated skin. Exfoliating agents, such as baking soda or sugar, remove dead skin cells, allowing fresh skin to emerge.
When combined, these ingredients work synergistically to accelerate the fading of scars and improve overall skin texture, enhancing your journey to clear skin.
Tips for Maximizing Results
To achieve the best results from your DIY mask for acne scars, it’s essential to establish a consistent skincare routine.
Start by cleansing your skin daily to remove impurities, ensuring your mask penetrates effectively. Apply the mask two to three times a week, allowing it to sit for the recommended time to maximize absorption.
After rinsing, follow up with a nourishing moisturizer to lock in hydration and enhance healing.
Don’t forget to incorporate a gentle exfoliant weekly; this’ll help slough off dead skin cells and promote cell turnover.
Finally, stay hydrated and maintain a balanced diet rich in vitamins and antioxidants. These steps will amplify your mask’s efficacy, leading to clearer, healthier skin in no time.
Additional Skincare Considerations
While focusing on your DIY mask for acne scars, it’s essential to contemplate other aspects of your skincare routine that can support your overall skin health.
Start by cleansing your skin twice daily to remove impurities and prevent breakouts. Incorporate a gentle exfoliant weekly to promote cell turnover, enhancing the mask’s effectiveness.
Don’t forget hydration; use a moisturizer suited to your skin type to maintain balance and elasticity. Sun protection is non-negotiable—apply a broad-spectrum sunscreen daily to shield your skin from UV damage, which can worsen scars.
Additionally, consider incorporating serums with ingredients like vitamin C or niacinamide to further brighten your complexion and improve texture.
Master these elements, and you’ll create a holistic approach to achieving radiant skin.
Frequently Asked Questions
Can This Mask Be Used on Sensitive Skin?
Yes, you can use this mask on sensitive skin, but start with a patch test. If you experience irritation, discontinue use. Always listen to your skin and adjust your routine accordingly for the best results.
Are There Any Side Effects to Expect?
You might experience minor irritation or redness, especially if you have sensitive skin. It’s best to patch-test before full application. If any severe reactions occur, discontinue use and consult a dermatologist for advice.
How Long Does the Mask Take to Dry?
The mask typically takes about 10 to 15 minutes to dry. You’ll want to make sure it’s completely set for best results. Keep an eye on the texture and color changes during that time.
Can I Store Leftover Mask for Later Use?
You can store leftover mask for later use, but make sure to keep it in an airtight container in the fridge. Just remember to check for any changes in texture or smell before applying again.
Will This Mask Work for All Skin Types?
Not every mask suits all skin types. You’ll need to assess your skin’s unique needs—whether it’s oily, dry, or sensitive. Testing a patch can help you determine if it works well for you.